G8JCFSDR Download

Click to join G8JCFSDR @ Groups.io
| HOME |
G8JCFSDR Download |
Click to join G8JCFSDR @ Groups.io |
Latest Version 1 November 2020 - Ver 1.00 Build 282
G8JCFSDR(Build 282) Full
Install
See bottom of page for previous releases
If you are having problems with installing or running G8JCFSDR please send G8JCF a message with any comments/questions. Problems under Vista/Windows 7/Windows 8/Windows 10, see VISTA/Win 7/Win 8/Win 10 Issues. The G8JCFSDR has been tested on all versions of Windows from Windows XP to Windows 10, and even under WINE.
Build 282 is a FULL install, ie there is no need to install any other version first. Your existing Bandplans, Themes and Registry settings should be preservedif you are upgrading from an earlier version.
To install just Download and Run .
Build 282 has many fixes and new features - see the QuickStartGuide for more details.
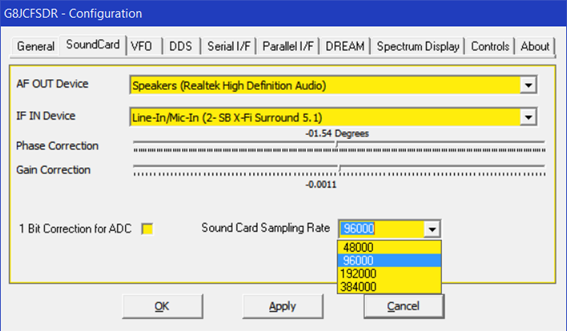
Higher IF sampling rates of :
48000 48KHz spectrum display width
96000 96KHz spectrum display width
192000 192KHz spectrum display width
384000 384KHz spectrum display width
assuming that your sound card can support these higher rates – every soundcard I have used supports 48000, and most support 96000, with some supporting 192000, and very few (very expensive) supporting 384000.
Note that the AF output sampling frequency is always 48000 samples/second enabling one to use the inbuilt soundcard and speaker(s) of your system whilst using a higher specification sound card to capture the IF output from the SDR down converter.
Synchronous AM Demodulation.
SAM. SAM demodulation can be of help when fading, QSB, causes the AM carrier to almost disappear into the noise. Also, when there is adjacent channel interference. QRM, SAM can be useful to select the opposite sideband to the one being interfered with.
SMD SAM Double Sideband, ie both sidebands used
SMU SAM Upper Sideband
SML SAM Lower Sideband
The SAM lock indicator will light up green when the G8JCFSDR’s internal numerically controlled oscillator is locked to the AM carrier.

Additional Calibration Functionality
The SDRShield calibration window in Config has been augmented to provide additional functionality including an improved frequency calibration method.
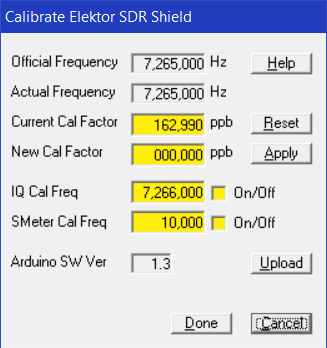
The IQ Cal Freq facility when switched on generates a carrier 1 KHz up from the current tuned frequency on CLK0 of the SI5351.
If you have a V 2 SDRShield then attach a short length, eg 30cm, of wire to the CLK0 header pins.
If you have a V1 SDRShield then very good soldering skills are required if you want to use this facility, ie not recommended.
Follow the procedure for IQ balance/Image rejection described in 4.7.
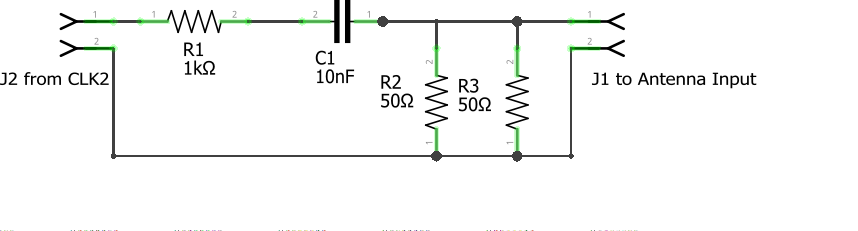
The SMeter Cal Freq when switched on generates a 10 KHz square wave on CLK2 of the SI5351 as described in Burkhard Kainka’s book, 7.2, “SDR Hands-on Book”. The output from CLK2 is 3V3 pk-pk or 1.65 V RMS. SMeter levels are measured in micro-volts, uV, so we use an attenuator (see below)), and the fact that square waves are rich in harmonics to generate signals in the uV range at HF. This arrangement will generate an S9 (50uV) signal at 7MHz, S8 at 14MHz, S7 at 28MHz.
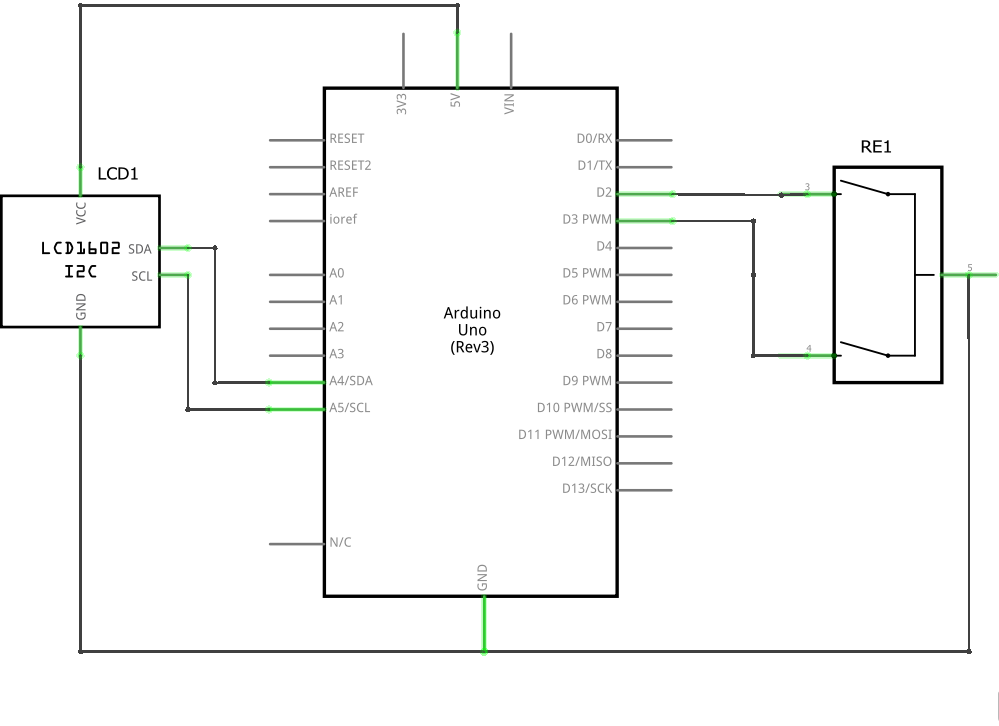
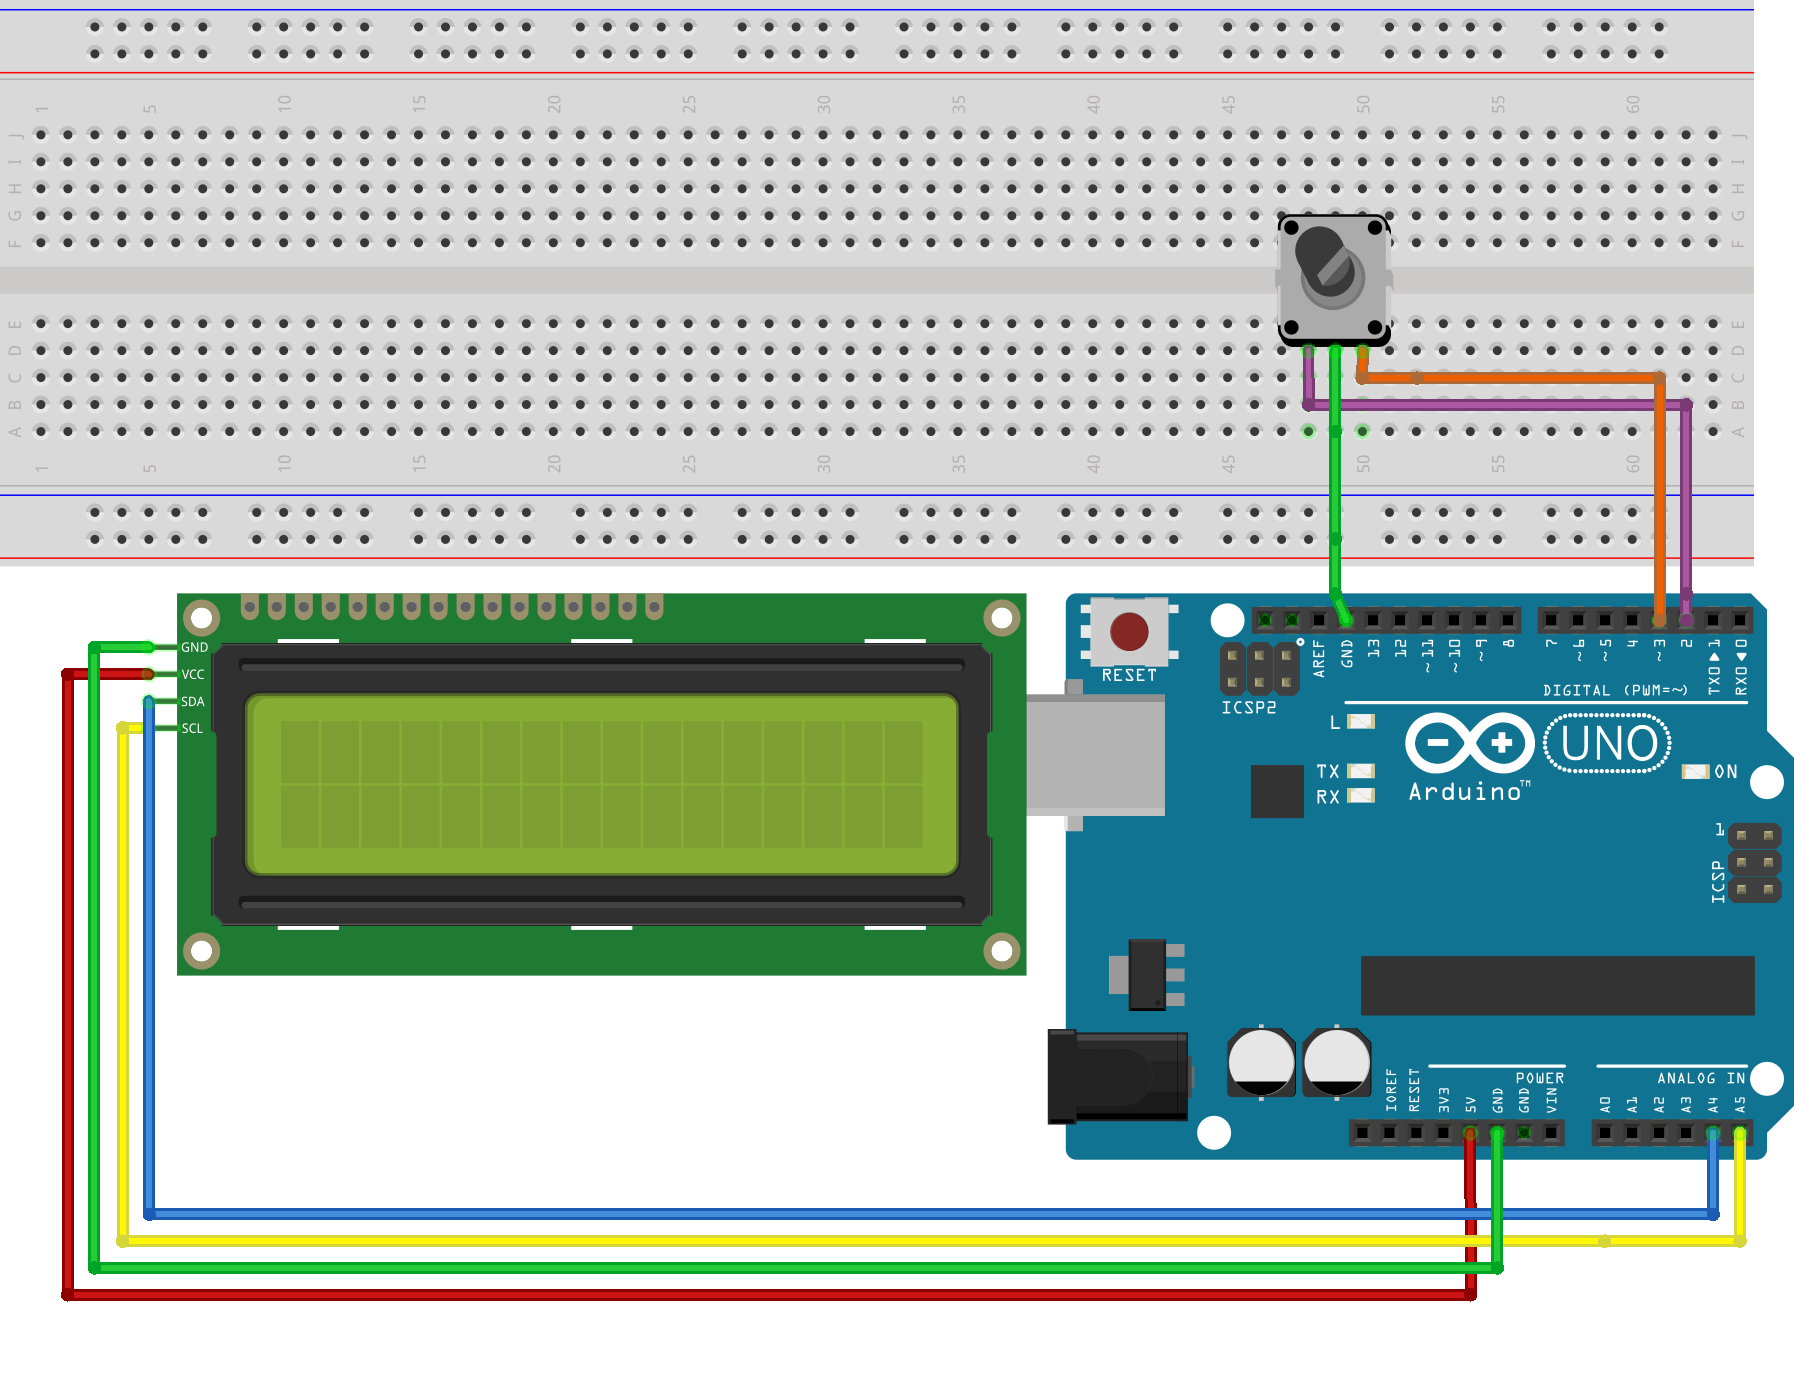
Rotary Encoder Tuning, 1602 I2C LCD
Use a rotary encoder for real hardware/knob tuning, and optionally an LCD for frequency display.
Connect a rotary encoder, eg ALPS EC16B2410408 RS 265-1723, A & B to pins 2 & 3 respectively and to OV.
Connect a 1602 I2C LCD, eg https://hobbycomponents.com/displays/74-i2c-serial-lcd-1602-module or of course eBay, to pin A4(SDA) and pin A5(SCL), you will also need to connect Vcc and GND to the I2C LCD module of course.
Build 280 is a FULL install, ie there is no need to install any other version first. Your existing Bandplans, Themes and Registry settings should be preservedif you are upgrading from an earlier version.
To Install just Download and Run.
Build 280 is a minor improvement on Build 274, so if you are not experiencing any problems, there is no great benefit from installing build 280.
The need for build 280 has arisen because some users are having problems uploading the .hex firmware into the Arduino Uno which controls the Elektor SDR Shield.
Build 280 includes extra components which should eliminate this problem, specifically :-
1) libusb0.dll is now included into the ArduinoCode directory which should enable averdude.exe to function even when the Arduino IDE isn't installed.
2) The graphical utility XLoader is now installed along with the G8JCFSDR under the G8JCFSDR Start Menu entry so that one can manually upload the .hex firmware to the Arduino Uno.
Some cosmetic changes have also been made to the G8JCFSDR Start Menu entries :-
1) Added Display QuickStartGuide shortcut
2) Added Display Readme shortcut
3) Added Display G8JCFSDR logfile
4) Tidied up G8JCFSDR Trace mode shortcut
5) Added a shortcut to instructions of how to control the G8JCFSDR from the keyboard - I use these to tune the SDR with a Griffin Powermate
6) Added a shortcut to make it very easy to send G8JCF an email using the http://g8jcf.uk website
The G8JCFSDR when currently run in Trace mode, stores the Logfile in 'c:\temp', which is somewhat untidy. Build 280, now uses the user specific environment variable %TEMP% for the directory of where to store the Logfile.
Other changes:-
1) I discovered that Hamlib support has been broken for a long time because of a missing .DLL file, which I have now rectified - does anybody use Hamlib ?
2) The addition of two new receiver interfaces, both of which are unusable by anyone else except myself. If you have a DRT1 and want to use it under Windows with a USB interface, then contact me becauise I do have code for an Arduino Uno which carries out the USB to bit-banging the lines into a DRT1, ie the interface from the PC to the Arduino is a very simple line oriented ASCII protocol, eg f 198000<RETURN>, and the Uno does the work of calculating the DDS register values and then sending them into the DDS chip. In the "good 'ol days" with real serial ports on PCs, this work was all done inside the PC and then bit banged out on the TX, DTR, & DTE lines, but that doesn't work with most USB<->Serial adapters (just too slow).
Build 267 is a FULL install ie NO need to install any other version first. Your existing Bandplans and Registry settings should be preserved if upgrading from an earlier version.
To Install, just Download and Run.
Build 274 fully supports the Elektor SDR Shield, aka SDR Reloaded. The audio stutter which sometimes occurs with the G8JCSDR has been eliminated in build 274, a 13 year old bug, sorry it took so long to track down !!
Build 267 is a FULL install ie NO need to install any other version first. Your existing Bandplans and Registry settings should be preserved if upgrading from an earlier version.
To Install, just Download and Run.
Build 267 has improved support for the Fifi SDR - includes the FiFi Extio support, includes support for Bonito RJ10, and support for a fixed 455 KHz IQ down converter for pan-adaptor usage with conventional radios, eg RA1792. If you're not experiencing any problems, and/or don't need the extra support, then you can safely ignore Build 267.
Build 256 is a FULL install ie NO need to install any other version first. Your existing Bandplans and Registry settings should be preserved.
To Install, just Download and Run.
Build 256 supports EXTIO_*.DLL much more comprehensively, in particular h/w using the SI570 with the DG2SAQ ATTiny MCU is well supported using EXTIO_SI570.DLL downloadable from - http://www.pe0fko.nl/CFGSR/ - I use this arrangement to operate my FiFiSDR - http://o28.sischa.net/fifisdr/trac - a low-cost IQ type SDR H/W front-end with built-in soundcard, (perfect for laptops), sold by Funk Amateur at http://www.box73.de/index.php?cPath=112_168_143.
Build 256 operates very happily on Intel Atom Netbooks such as the ASUS EEEPC901 and SAMSUNG NC10 - be sure to tick the "Use Intel SPL" checkbox on the General tab of Config.
Build 256 also supports very full use of the keyboard
Apart from the items above, there have also been
numerous little fixes including making the G8JCFSDR easier to install
onto Windows 7, and a general tidy up of the code.
Build 243
Build 243 is an Update to the .EXE. You must have previously installed Build 231 or Build 232 or Build 234 for this Update to work.
To Install, download, unzip, and copy G8JCFSDR_243.EXE
into the
same directory where you currently have G8JCFSDR stored.
1) Rename the existing G8JCFSDR.EXE to something
else, eg
G8JCFSDR_231.EXE
2) Rename G8JCFSDR_243.EXE to G8JCFSDR.EXE
3) Run G8JCFSDR from the Start Menu
Fixes & Features
1) Fixes the Error 13 problem caused when
Non EN locale is selected, ie "," instead of "." is used for decimal
point
2) Supports PMSDR
3) Supports Soft66AD-M
Build 234
Build 234 is an Update to the .EXE. You must have previously installed Build 231 or Build 232 for this Update to work.
To Install, download, unzip, and copy G8JCFSDR_234.EXE
into the
same directory where you currently have G8JCFSDR stored.
1) Rename the existing G8JCFSDR.EXE to something
else, eg
G8JCFSDR_231.EXE
2) Rename G8JCFSDR_234.EXE to G8JCFSDR.EXE
3) Run G8JCFSDR from the Start Menu
Fixes & Features
1) Support for the Pappradio SDR
hardware
using the EXTIO_*.DLL mechanism
Download and install the
Pappradio
extio files from www.pappradio.de
,
configure the COM port, then copy extio_pappradio.dll, config.ini &
fqdata.dat into the same directory as the G8JCFSDR
2) Elektor SDR boards: Previous builds of G8JCFSDR required the L<->R checkbox to be checked for Ver 1.1 Elektor boards. In build 234, the default is that v 1.1 boards do NOT need the L<->R checkbox ticked - Elektor retracked the board so that the 3.5mm IF output jack fitted correctly on the component side of the board and in process corrected the IQ output wiring. Users with the V1.0 Elektor boards will now need to check the L<->R checkbox. Remember to set -P in the DREAM configuration parameters for correct operation with DREAM.EXE
3) The CB bandplan should now work properly
Build 231
Build 231 is a full Install. Your existing Bandplans and Registry settings should be preserved.
1) Alternative Spectrum Smoothing Algorithm.
Build
231 has a
new alternative Spectrum smoothing algorithm which is slightly less CPU
intensive although I personally feel that the display is not as nice as
the
current smoothing algorithm - to change Spectrum smoothing algorithm go
into
Config, then under the Spectrum Display tab select A (Current
algorithm) or B.
2) How to use Slide and Tune on the Spectrum Display.
a) Select Pre-Demod as the
source,
turn on Show Filter
b) Left click over the
spectrum will
retune the Hardware VFO
c) Right click over the
spectrum will
retune the internal s/w NCO or BFO to demodulate the signal
d) Right Click over the
Slide 'n Tune
Thumb above the Spectrum will set the s/w NCO to default, ie at the
12KHz
position on the LHS of the display, 3 divisions from the left hand
edge. Do this
when receiving DRM signals so that the DRM signal is at 12KHz as
expected by
DREAM.
e) Left Click over the Slide
'n Tune
Thumb above the Spectrum will retune the s/w NCO to the mouse position
to
demodulate the signal
f) The buttons above the
Spectrum
will retune the h/w VFO up or down by 48Khz for IQ Rxs such as the
Elektor SDR,
and +24 or -24 for
single ended Rxs such as the DRT1 and DRB32.
3) 10KHz-30MHz Tuning Range.Tuning range has now been extended
down to
10KHz, so reception of MSF on 60KHz and DCF on 77KHz is now possible -
the LMS
noise reducer really helps bring out the signal
4) 48KHz Up Down Quick Tune. There are Up and Down buttons on
the
Spectrum Display enabling a very quick +48KHz or -48KHz frequency shift
for band
scanning for activity
5) On the spectrum display, a Right click over a signal, tunes in that
signal,
but doesn't change the h/w VFO
6) The spectrum display filter option behaves more as expected, ie
there were
lots of bugs before !!
7) LMS Adaptive Noise Reduction - hover over the ON checkbox for config instructions - Also, the LMS noise blanker should retain its settings between runs but more to do in this area. I've found settings of MU=0.00381, Leakage=0.99999, Taps=49, DelayLine=0, Type=B, NormaliseGain=True to work quite well.
8) LMS Notch cancellation - hover over the new NOTCH checkbox inside the filters section for config instructions
9) Impulse Noise Blanker
10) Lower CPU consumption - lots of functions
coded in
optimised FPU assembler, but try
and locate
a copy of the Intel Signal Processing
Library to reduce CPU consumption drastically.
11) 50% More Presets. 6 More presets per band, ie 18 up from 12 in earlier builds
12) Better IQ Balancing. New algorithm for
balancing I
& Q channels - you should be able to reduce the image into the
noise floor,
ie at least -60dB without too much fiddling
Build 216
Installation : Download and Unzip Build 216 into the same directory where you have installed Build 205. Then rename G8JCFSDR.EXE to G8JCFSDR_205.EXE and then rename G8JCFSDR_216.EXE to G8JCFSDR.EXE
1) Keypad for direct frequency entry — both onscreen and real keyboard work. To enter frequencies using the new keypad feature:
a) click the SET button just under the main 7 Seg display and the keypad will pop up.
b) click on the digit button using the mouse to enter a frequency or type in the frequency using the PC’s keyboard. You can enter a frequency in several ways:i) Enter the frequency in MHz and press the MHz button or type the letter M (case insensitive), eg if you enter 10M then the frequency >will be set to 10 MHz. For example, if you enter 10.125M then the frequency will be set to 10.125 MHz.
ii) Enter the frequency in kHz and press the kHz button or type the letter K (case insensitive), e.g. if you enter 5050K then the frequency will be set to 5050 kHz, e.g. if you enter 5050.010K then the frequency will be set to 5.050010 MHz.
iii) Enter the frequency in Hz and press the Hz button or type the letter H (case insensitive).c) To dismiss or close the keypad, either click on the RED X in the >top right hand side, or press the ESC key on the keyboard – you can also click the SET button when the keypad is onscreen and that will dismiss it as well.
d) To clear a frequency click on the C button or type C on the >keyboard — a backspace will be added in the next release
e) To position the keypad, press and hold down the left mouse button the blue strip at the top of the keypad window and move the keypad to where you want it. You can also move the keypad window using the same technique over a bare area of the keypad window.
2) Drag 'n Tune now more fully implemented - still more to do!
Right mouse click will tune the s/w NCO, whereas left click will tune the h/w VFO. Also see the + - buttons at top Right Hand of scope display.
3) NTI DRB32 now supported via Parallel Cable as well as USBADP (be sure to press DEFAULT button on Config Tab under Parallel I/F)
4) Improved SAM mode for non-IQ down-converters (whistle has been removed).
5) Changed the Hamlib code from using the VFO_CURRENT to using VFO_A, this may help with the DWT, but it may also stop working with other rigs like the DRT1 - I haven't got my DRT1 to hand right now, so if someone has a DRT1 I would really appreciate a report if the DRT1 in Hamlib mode is still working — and if anyone has a Coding Technologies:DWT, then Peter would also really appreciate a report of success or not.
6) More settings persisted between runs
7) Improved the Experimental NR, around 12% seems to work best, click "DYN", and Click "Music".
Build 205
1) Full install - no need to install
build 147
first
2) OS Restriction removed, so it should install on
VISTA, but
see VISTA & Win 7 Issues
for VISTA & Win 7
specific
workarounds
3) Bit-bang mode over FTDI FT232 chips has been made
much
faster, this is most noticeable when using the NTI DRB30, the DRTI and
the
Elektor 3/04
4) Elektor 3/04 over FTDI US232C converter now works !
5) B/W display on the Spectrum Analyser now shows the
correct
width - Default Colour changed to Gray
6) There is a dead patch on Long Wave between
175~188KHz in
build 198, in this build, you should be able to tune in 1KHz steps
right across
LW band
7) Have added the other inputs on the Elektor IQ/SDR,
Aux1,
Aux2, Aux3
8) The extended panel for Elektor IQ/SDR support is
only
visible when Elektor IQ/SDR is selected, for all other rxs this panel
is hidden
and the G8JCFSDR display is re-sized accordingly
9) When the RX is off, U can adjust the scope display
controls, eg Hz/Div and adjust the spectrum display - useful for
examining
signals in depth
10) New Quick Start Guide with Soundcard IQ checking
instructions
11) HamLib DLLS now available as an install program
Other small fixes here and there.
Build 198
1) ELEKTOR May 2007 USB SDR Support
added -
Run ELEKTOR s/w first, and Upload InitCal.bin.
2) Full Speed USB Support for serially controlled RXs
like the
DRT1, ELEKTOR DRM - FTDI
UC23R - select UC232 in Config. Uses Async Bit-Bang mode, so full
speed
unlike usual USB<->RS232 converters - Highly recommended and very
good
value - great for notebooks
Build 191
1) NTI DRB USB ADP support added
Build 190
1) HAMLib Support added - Download HamLib DLL Pack
Build 187
1) Fixed problems for IQ Xtal controlled downconverters such as FunkAmateur SDR, and Soft Rock - these had got broken by Build 168
Build 186
1) Supports the NTI DRB30
2) Supports IQ receivers using CY27EE16 I2C over serial port for IQ VFO
- /4
only, 100KHz~30MHz, 1KHz steps see http://www.b-kainka.de/iqrx.htm
& http://www.b-kainka.de/iqrx3.htm
3) Supports IQ receivers using AD9851 for IQ VFO with /2 or /4 option
4) Supports IQ receivers using AD9951 for IQ VFO with /2 or /4 option
(partially
tested) 4) Timing in the parallel & serial i/f has been been
corrected
5) Synchronous AM, SAM, demodulator for single ended downconverters, eg
DRT1,
Elektor DRM, NTI DRB30
6) Support for AD9835+CY27EE16 combo for IQ rx - see http://www.elexs.de/iq5.htm
7) Error handling improved
8) Ability added to configure which bits on the parallel i/f can be
used for
IOUPD/SCLCK/SDATA
9) Re-instated ability to select Com ports under Serial I/F tab in
Config 10)
Changed SMeter so that it only sees signals within selected bandwidth
IQ Support - (Build 168)
Full support for IQ down-converters, eg Soft Rock, Funk
Amateur,
& ELEXS AD9835+CY27EE16 combo. Also support for an AD9850 LO
followed
by the classic 74AC74 divide by 4 arrangement.
Select Model number in Config from drop down list. "IQ, Crystal
Controlled" is a generic model covering all Xtal controlled IQ
downconverters. Set the Xtal frequency.
Build 168 only provides 24KHz of spectrum display at a time. To
tune/view the
'upper part', click on "IQ Upper" checkbox
New/Fixes - (Build 147)
1) Change any
colours
on the SDR - See Controls TAB in configuration
2) Mirror the Notch filter,
ie see
what the notch filter is cutting out
3) Start of IQ downconverter
support -
see Config - General Tab, Select IQ Xtal Rx
4) Fixed incorrect detection
of iSPL
5) Lots of small stuff all
over the
place
Changes/New:- (Build 126)
1)
Asymmetrical IF
Filter/Passband Tuning - AM/BC only - Thanks Wolfgang - v. good for
eliminating
Broadcast AM adjacent-channel interference
2) Notch Filter display shows
Notch
width - Thanks Wolfgang
3) Notch filtering at AF or
IF
frequencies - use Pre-Demod to see IF notching in action, use AF-Out to
see AF
notching in action
4) Shift + Scrollwheel gives
large
changes - hold down SHIFT and then scroll the mousewheel
5) Ctrl + Scrollwheel gives
very fine
adjustments - hold CTRL and then scroll the mousewheel
6) SMeter display shouldn't
flicker
anymore - double buffering implemented
7) Smoothing of spectrum
display now
user controllable 1~24 sampling periods
8) More persistence between
executions, ie the SDR remembers and restores more settings
9) Non-English language
support
improved - most things now in KHz or Hz
10) Chn2 of Spectrum Display now shows IF
Input
before filtering when showing Pre Demod signal - Chn1 shows actual
filtered
signal
11) AGC settings stored with each preset
12) Improved error handling - should
eliminate the
iSPL "N<=0" error
13) Lots of detailed fixes - Thanks
Friedrich
14) AutoDDSRefresh feature - Thanks
Kjell/Michel -
user selectable option to ENABLE periodic re-initialisation, 1~1.5secs,
of DDS
chip - Do NOT enable if using simple/low-cost USB/RS232 converters, can
cause
SDR to stall
15) Multiple Soundcard support - SDR
remembers
soundcard selection between executions - supports IF input on one
soundcard,
with AF output on different soundcard
16) DRM mode now outputs DRM signal at
12KHz after
IF Filtering and Notch Filtering if you want to use Virtual Audio
Cable, VAC, to
feed SDR output into DREAM input
17) Starting G8jcfsdr_drt1.exe with a
command line
parameter of "trace" generates startup logging file in
c:\g8jcfsdr_drt1.log, ie g8jcfsdr_drt1.exe trace
18) User settings for each filter
selection, ie
you can change the default filter cutoffs for each pre-defined filter
setting
19) User settings for each AGC selection,
ie you
can change the default Attack & Decay times for each pre-defined
AGC setting
20) S/W version now displayed - Thanks
Friedrich -
see Power frame
21) Tuning by scrollwheel over 'scope
mechanism -
Thanks Michel - Enable feature in CONFIG - then scrollwheel will tune
SDR when
mouse is over 'scope. Height up the 'scope determines increment. 10Hz
at bottom,
1000Hz at top, 500Hz in the middle etc.
Tips:-
a) Press CTRL when over a
preset to
toggle the preset detailed display
b) Right mouse click over
scrollable
labels to reset the control to its default value
c) Tune the SDR by
left-clicking on a
signal over the Spectrum display - tunes to the nearest KHz
d) Single left mouse click
over a
digit on the Tuned Frequency display locks the tune rate to that digit
- double
click gives free-tuning mode
e) Single left mouse click
over the
Virtual Tuning Dial cycles through shaft encoder tuning rates
f) Shift+Left Click on
a preset
stores the SDR's current values to that preset - also try Right Click
over the
preset
Build 63, Build 42, Build 30, G8JCFSDR_DRT1 (Build 87), G8JCFSDR (Build 89) Alpha Release - Elektor DRM & DRT1 , Update G8JCFSDR Build 89 to Build 113 (Download UnZip & Copy .exe), G8JCFSDR(Build126), G8JCF_Build147, G8JCFSDR_Build168, G8JCFSDR_Build186, G8JCFSDR_Build187, G8JCFSDR_BUILD190, G8JCFSDR_Build191, G8JCFSDR_Build198, G8JCFSDR_Build205,G8JCFSDR_Build234, G8JCFSDR_Build243, G8JCFSDR_Build253, G8JCFSDR_Build256, G8JCFSDR_Build267, G8JCFSDR_Build274, G8JCFSDR_Build282, HAMLibDLLS.ZIP